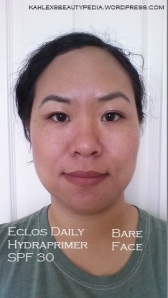
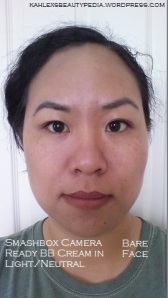
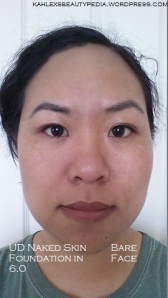
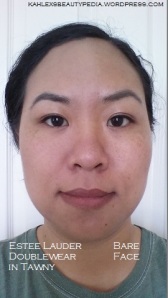
I was originally planning on making one huge post on foundation in general, but it got too long. There is a lot of information out there about foundation, and you don’t need to be reading a dissertation on the subject in one sitting. Therefore, I have decided to split it into two posts. In this post, I will go over selecting the right foundation. In the next post, I will go over ways to apply foundation. Again, this post is all about selecting the right foundation. Hopefully, I’m also able to de-mystify some of the terms you’ve seen floating around.
Formulation
This is the first thing you want to think about, because the formula of a foundation affects how it will apply and how it will feel on your skin.
Liquid foundations are good for all skin types, depending on formulation. There are many different formulas for all different skin types, so it’s difficult to generalize. Liquid foundations are easy to apply using a number of different methods.
Mousse/Whipped/Cream foundations are best for normal and dry skin. Because they have a thicker texture, they provide heavier coverage and more moisture. Those with oily or combination skin can use mousse/whipped/cream foundations, but be aware that they may feel heavier.
Cream compact/Stick foundations are thicker and creamier, and therefore provide even more moisture and coverage. They are portable, so touch-ups are easy. Generally, these are not good for oily or blemish-prone skin because they are so thick. Some are cream-to-powder formulations, meaning that when they set, they feel and look like powder. Cream-to-powder formulations would be more suitable for oilier skin types.
Powder foundations are generally good for oily and combination skin. Powder can cling to and emphasize dry patches, so they are generally not recommended for those with drier skin. However, there are some formulations that are more moisturizing or more forgiving on drier skin. Because they come in compacts, they are good for on-the-go touch-ups. Many people use a powder foundation on top of a liquid or cream foundation to set it and provide additional coverage. However, be aware that this may cause the foundation to oxidize and turn a few shades darker, so you may wish to use a powder foundation that is slightly lighter than your skin tone (test this out before you purchase). Powder foundations can also be used on their own.
Mineral foundations are good for all skin types. They feel very light on the skin. They are made from micronized minerals and should not irritate skin (note: bismuth oxychloride, a common ingredient in many mineral foundations, is a known skin irritant; if you know your skin is sensitive and you are interested in mineral makeup, avoid those that contain bismuth oxychloride). The micronized minerals reflect light, so mineral makeup helps hide crows’ feet and fine lines.
Airbrush foundation is long-lasting, will not transfer, applies evenly, and gives a natural, flawless look. It is preferred in bridal makeup. However, you either have to invest in airbrush system (quite the investment) or purchase a foundation that is in a spray can, such as Dior DiorSkin Airflash Spray Foundation or the Sephora Perfection Mist Airbrush Foundation.
Base
Different bases can cause a foundation to feel different on the skin. Additionally, this is something to keep in mind if you have a primer that you love (or if you’re looking into buying a primer), because you want the base of your primer and your foundation to match. Click here to read my post on how to tell whether a product is silicone-, water-, or oil-based. Click here to read my post on face primers.
Water-based foundations generally have a lighter texture and give a less shiny finish. They absorb/set more quickly because the water absorbs into your skin.
Silicone-based foundations are the most popular. They apply and blend smoothly and evenly. They are good at filling in lines and pores and evening out skin texture. They are less likely to oxidize, or change color when it comes into contact with air/sebum (oil naturally produced by your skin).
Oil-based foundations are exceedingly rare, but not non-existent. They are much thicker and more moisturizing. They are best suited for very dry or wrinkled skin because they provide a lot of extra moisture.
Coverage
Next, you want to think about how much coverage you want. In other words, how opaque do you want the foundation to be?
Sheer coverage is the most transparent. This may even out your skin tone, but will not cover any discoloration or hyperpigmentation. Sheer coverage is mostly for people who already have fairly perfect skin or for people who are looking for a very natural look.
Light coverage products can cover minor unevenness in your skin tone, such as slight blotchiness, but is not opaque enough to fully cover hyperpigmentation. If you have freckles, they will show through a light-coverage foundation. Light coverage is also good for a natural look.
Medium coverage products can cover freckles, discoloration, blotchiness, and hyperpigmentation. They are generally good for everyday, as they even out the complexion while still looking natural.
Full coverage is basically like painting a mask onto your face. You can use a full-coverage foundation to cover birthmarks, scars, tattoos, and pretty much anything else.
A foundation that is buildable can be applied in several layers without becoming cake-y (i.e. it will still look natural). This gives you versatility regarding how much coverage you can get out of one product. I will discuss this more when I discuss application in a later post.
Finish
A completely matte finish has no shine at all. It is best for oily skin, as a foundation with a matte finish often helps absorb oil. It is generally not recommended for dry skin, as it can emphasize dry patches and flakiness.
A semi-matte or natural finish is in between matte and dewy. This mimics the natural finish of healthy skin.
A foundation with a dewy or luminous finish is infused with finely ground light-reflective particles to help diffuse the look of fine lines and wrinkles. It is recommended for dry and/or mature skin, as it adds luster that they might not naturally possess.
Feeling
It is also important to consider how a foundation feels on your skin. Generally, the more coverage a foundation provides, the heavier it will feel. There aren’t really any guidelines or groundbreaking definitions (light = light, heavy = heavy, and something in the middle = something in the middle), but it is definitely something to keep in mind. Go with what feels comfortable on your face.
Choosing the Right Color
Finding the right shade can be especially tricky. You’re going to look at yourself in natural lighting with no makeup on (also, pull your hair back or cover it in a white towel, just so you’re looking solely at your face). If you choose to get matched by a makeup artist at Sephora/Ulta or a department store counter, they are likely to ask you to take off your foundation (if you’re wearing any). They tend to match under fluorescent lighting, though, so it could turn out to be a shade or two too dark once you go out into natural light. Always check the match in natural lighting.
Undertone
Undertones are actually on a spectrum going from cool (pink undertones) to neutral (pink and yellow undertones) to warm (yellow undertones). I find that not everybody fits neatly into a single category. In other words, most people are neither completely yellow (unless you have jaundice or are a Simpson [is Lisa old enough to wear makeup yet?]) nor completely pink. Here are some typical ways of finding out what your undertones are:
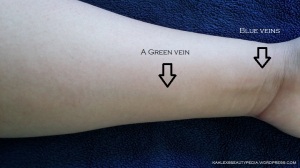
1. Look at the blood vessels on the underside of your arm. If they look blue, then you have a cool undertone. If they look green, then you have a warm undertone. If you either cannot tell or have both blue and green blood vessels, then you are neutral. I have some blue veins and a few green veins, so according to this test, I have neutral undertones.
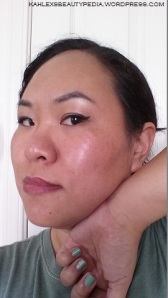
2. Drape a white towel or piece of cloth around your neck and shoulders (or hold a white piece of paper under your face, like I did) and look at your face. The white will reflect the true color. If your face looks more pink, then you have cool undertones. If your face looks more yellow, then you have warm undertones. If you can’t tell, then you probably have neutral undertones. My face looks more yellow, which indicates that I have warm undertones. 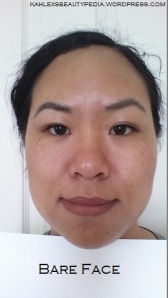 3. What colors do you prefer in your clothing? If you think you look best in cool colors, then you probably have cool undertones. If you think you look best in warm colors, then you probably have warm undertones. If you think you look great in every color, then you probably have neutral undertones. I haven’t found a color I looked terrible in yet, so according to this test, I’m neutral.
4. What jewelry looks best on you (this is not a question of what you prefer, but what you think looks best on you)? If silver jewelry looks best on you, then you probably have cool undertones. If gold jewelry looks best on you, then you probably have warm undertones. If you look great (or terrible) in everything, then you probably have neutral undertones. Now, I prefer wearing silver jewelry, but I have to admit that gold looks better on me, which indicates that I have warm undertones.
5. What happens when you are exposed to the sun for extended periods of time? If you burn and either tan minimally or not at all, then you probably have cool undertones. If you tan easily and tend to not burn, then you probably have warm undertones. If you spontaneously burst into flames, then you are a vampire, and you should probably be more careful. I tend to tan very easily. I don’t tend to burn. This indicates that I have warm undertones.
If your results from asking all of these were different, as mine were, then you may be neutral, leaning warm or leaning cool. Here is a summary of my results:
1. Neutral
2. Warm
3. Neutral
4. Warm
5. Warm
Basically, if you put cool to warm on a scale from 1-10 (1 being 100% cool, 5 being neutral, and 10 being 100% warm), I think I’d be somewhere around an 8 or 9. All it really means is that I’m going to gravitate toward foundations with warmer undertones. If you use a foundation that is the correct shade, but the wrong undertone, you won’t look right. I was matched as NC 25 (the MAC system goes by NOT Cool [NC = warm] and NOT Warm [NW = cool], if you ever get confused about their shades) in the MAC Studio Fix Fluid Foundation. Behold: NW 25.
See how the half of my face with the foundation on it looks kind of pink? Now, because I have neutral-warm undertones, it’s not SO bad. I can still make it work without looking completely bizarre (also, I seem to be some kind of blending wizard… or maybe it’s just a really blendable foundation). You’ll see in a later photo that it really is too pink for me.
It is important to note that just because you have natural rosiness in your skin (ex. pink cheeks, red splotches, etc.) does not necessarily mean that you have cool (pink) undertones. If you’ve ever tried a foundation that made you look too pink or too yellow, then you likely used a foundation with the wrong undertone.
Shade
Finding the right shade is somewhat simpler. You basically just look for whatever looks like it is the color of your skin (make sure it’s the right undertone, of course). Now, this is how I like to find the right shade (typically at Sephora, Ulta’s higher-end section, or a department store counter, where I can swatch foundations):
1. At home, when you still have no makeup on your face, put the back of your hand up next to your face and look at the difference in color. For me, the back of my hand is a few shades darker than my face.
2. Still at home, still with no makeup on your face, put the inside of your arm up next to your face and look at the difference in color. For me, the inside of my arm is a few shades lighter than my face.
3. Go to the store/counter and swatch shades that look pretty close on both places. I look for a shade that is between the shades of the back of my hand and the inside of my arm.

NC 20 blends pretty well into my skin on the inside of my arm, so it will be too light for my face. Also, you can see that NW 25 is too pink.
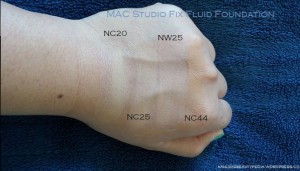
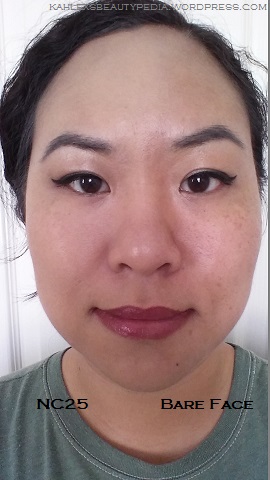
NC 25 is slightly too light on the back of my hand, but slightly too dark on the inside of my arm, which means it should match my face.
4. You want to test the foundation along your jawline and make sure it matches both your neck and your face. I start by swatching on my hand and arm because you have pretty limited space on your face, while you (probably) have two hands and two arms, so you can swatch a lot. I don’t really mind having hardcore Swatch Hands/Arms, but I don’t really want to have Swatch Face. You don’t want your face looking like a patchwork quilt, do you? Even if you continuously wipe off the swatches, I just don’t want to be swatching and wiping foundation swatches off of my face too much (in fact, doing all the half-face swatches for this post made my face very unhappy). Personal preference.
5. When you find something that looks like the right shade, you want to actually blend it in along your jawline. Alternatively, apply it all over your face (a sales associate may do this for you, if one of them is assisting you). 6. Go near a window or outside with a mirror (I usually have a compact with me because I just love staring at myself find it handy for touch-ups on the go, since I’m not always someplace with a mirror). Check the shade match in natural lighting. A shade that is too light will look ashy on you. Here is NC 20:
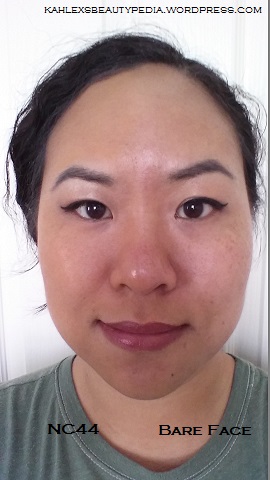
A shade that is too dark will look kind of orange, because that is how additional pigment tends to look on the skin. Here is NC 44 (I asked for a sample of foundation that would be visibly too dark for me on camera. I think this is a little dramatic, but it does demonstrate the point really well).
The shade that is just right will blend right in and not look out of place at all. Here is NC 25:
Keep in mind that your skin may be different colors according to the seasons. In the summer, when you are exposed to more sunlight, you may need a darker shade. In the winter, when you are exposed to less sunlight, you may need a lighter shade. When you’re in between shades (since you don’t become more tan or more pale all at once), you can mix your foundations to get the right shade.
Oxidation
When a foundation mixes with your sebum (i.e. natural oils produced by your skin), it may oxidize, or darken in color. If you notice a foundation turning darker or orange on you over the course of the day, this means it is oxidizing. Ideally, your foundation will not oxidize. However, using a primer can help prevent oxidation by creating a barrier between your skin and your foundation, which prevents your sebum and your foundation from mixing. Using a translucent powder to set your foundation can also help prevent oxidation.
Lasting Power
So you’ve found a foundation with a formula that you like that provides the coverage you want that is the right undertone and shade. Now it’s time to test the lasting power. Ask for a sample (if you’re at a counter, since drugstores don’t tend to provide samples). If the sales associate gets catty or mean about samples, or then explain that you want to test the color match in natural lighting, see how long it lasts, and test how well it wears throughout the day before you invest in a more expensive foundation. Most sales associates will be understanding and provide you with a sample, but if not, then ask someone else. Ideally, you want your foundation to last all day (probably approximately eight hours). Primers, setting powders, setting sprays, and touch-ups throughout the day can help your foundation last all day.
Summary
In sum, you want your foundation to have your desired:
- Formula (liquid, cream, powder)
- Base (silicone, water, or oil)
- Coverage (sheer, light, medium, full)
- Buildability
- Finish (matte, natural, luminous)
- Feeling (light, medium, heavy)
- Shade
- Undertone (warm, neutral, cool)
- Wear time
I know this is a lot to consider, but when everything is just right, it will be like angels from heaven perfected your face. I hope this post was helpful, and I wish you all luck in your foundation searches! Feel free to leave comments, questions, and feedback below.
