Selecting the Right Foundation

I was originally planning on making one huge post on foundation in general, but it got too long. There is a lot of information out there about foundation, and you don’t need to be reading a dissertation on the subject in one sitting. Therefore, I have decided to split it into two posts. In this post, I will go over selecting the right foundation. In the next post, I will go over ways to apply foundation. Again, this post is all about selecting the right foundation. Hopefully, I’m also able to de-mystify some of the terms you’ve seen floating around.

Formulation

This is the first thing you want to think about, because the formula of a foundation affects how it will apply and how it will feel on your skin.

Liquid foundations are good for all skin types, depending on formulation. There are many different formulas for all different skin types, so it’s difficult to generalize. Liquid foundations are easy to apply using a number of different methods.

Mousse/Whipped/Cream foundations are best for normal and dry skin. Because they have a thicker texture, they provide heavier coverage and more moisture. Those with oily or combination skin can use mousse/whipped/cream foundations, but be aware that they may feel heavier.

Cream compact/Stick foundations are thicker and creamier, and therefore provide even more moisture and coverage. They are portable, so touch-ups are easy. Generally, these are not good for oily or blemish-prone skin because they are so thick. Some are cream-to-powder formulations, meaning that when they set, they feel and look like powder. Cream-to-powder formulations would be more suitable for oilier skin types.

Powder foundations are generally good for oily and combination skin. Powder can cling to and emphasize dry patches, so they are generally not recommended for those with drier skin. However, there are some formulations that are more moisturizing or more forgiving on drier skin. Because they come in compacts, they are good for on-the-go touch-ups. Many people use a powder foundation on top of a liquid or cream foundation to set it and provide additional coverage. However, be aware that this may cause the foundation to oxidize and turn a few shades darker, so you may wish to use a powder foundation that is slightly lighter than your skin tone (test this out before you purchase). Powder foundations can also be used on their own.

Mineral foundations are good for all skin types. They feel very light on the skin. They are made from micronized minerals and should not irritate skin (note: bismuth oxychloride, a common ingredient in many mineral foundations, is a known skin irritant; if you know your skin is sensitive and you are interested in mineral makeup, avoid those that contain bismuth oxychloride). The micronized minerals reflect light, so mineral makeup helps hide crows’ feet and fine lines.

Airbrush foundation is long-lasting, will not transfer, applies evenly, and gives a natural, flawless look. It is preferred in bridal makeup. However, you either have to invest in airbrush system (quite the investment) or purchase a foundation that is in a spray can, such as Dior DiorSkin Airflash Spray Foundation or the Sephora Perfection Mist Airbrush Foundation.

Base

Different bases can cause a foundation to feel different on the skin. Additionally, this is something to keep in mind if you have a primer that you love (or if you’re looking into buying a primer), because you want the base of your primer and your foundation to match. Click here to read my post on how to tell whether a product is silicone-, water-, or oil-based. Click here to read my post on face primers.

Water-based foundations generally have a lighter texture and give a less shiny finish. They absorb/set more quickly because the water absorbs into your skin.

Silicone-based foundations are the most popular. They apply and blend smoothly and evenly. They are good at filling in lines and pores and evening out skin texture. They are less likely to oxidize, or change color when it comes into contact with air/sebum (oil naturally produced by your skin).

Oil-based foundations are exceedingly rare, but not non-existent. They are much thicker and more moisturizing. They are best suited for very dry or wrinkled skin because they provide a lot of extra moisture.

Coverage

Next, you want to think about how much coverage you want. In other words, how opaque do you want the foundation to be?

Sheer coverage is the most transparent. This may even out your skin tone, but will not cover any discoloration or hyperpigmentation. Sheer coverage is mostly for people who already have fairly perfect skin or for people who are looking for a very natural look.

Sheer coverage

Sheer coverage

Light coverage products can cover minor unevenness in your skin tone, such as slight blotchiness, but is not opaque enough to fully cover hyperpigmentation. If you have freckles, they will show through a light-coverage foundation. Light coverage is also good for a natural look.

Light coverage

Light coverage

Medium coverage products can cover freckles, discoloration, blotchiness, and hyperpigmentation. They are generally good for everyday, as they even out the complexion while still looking natural.

Medium coverage

Medium coverage

Full coverage is basically like painting a mask onto your face. You can use a full-coverage foundation to cover birthmarks, scars, tattoos, and pretty much anything else.

Full coverage

Full coverage

A foundation that is buildable can be applied in several layers without becoming cake-y (i.e. it will still look natural). This gives you versatility regarding how much coverage you can get out of one product. I will discuss this more when I discuss application in a later post.

Finish

A completely matte finish has no shine at all. It is best for oily skin, as a foundation with a matte finish often helps absorb oil. It is generally not recommended for dry skin, as it can emphasize dry patches and flakiness.

A semi-matte or natural finish is in between matte and dewy. This mimics the natural finish of healthy skin.

A foundation with a dewy or luminous finish is infused with finely ground light-reflective particles to help diffuse the look of fine lines and wrinkles. It is recommended for dry and/or mature skin, as it adds luster that they might not naturally possess.

Feeling

It is also important to consider how a foundation feels on your skin. Generally, the more coverage a foundation provides, the heavier it will feel. There aren’t really any guidelines or groundbreaking definitions (light = light, heavy = heavy, and something in the middle = something in the middle), but it is definitely something to keep in mind. Go with what feels comfortable on your face.

Choosing the Right Color

Finding the right shade can be especially tricky. You’re going to look at yourself in natural lighting with no makeup on (also, pull your hair back or cover it in a white towel, just so you’re looking solely at your face). If you choose to get matched by a makeup artist at Sephora/Ulta or a department store counter, they are likely to ask you to take off your foundation (if you’re wearing any). They tend to match under fluorescent lighting, though, so it could turn out to be a shade or two too dark once you go out into natural light. Always check the match in natural lighting.

Undertone

Undertones are actually on a spectrum going from cool (pink undertones) to neutral (pink and yellow undertones) to warm (yellow undertones). I find that not everybody fits neatly into a single category. In other words, most people are neither completely yellow (unless you have jaundice or are a Simpson [is Lisa old enough to wear makeup yet?]) nor completely pink. Here are some typical ways of finding out what your undertones are:

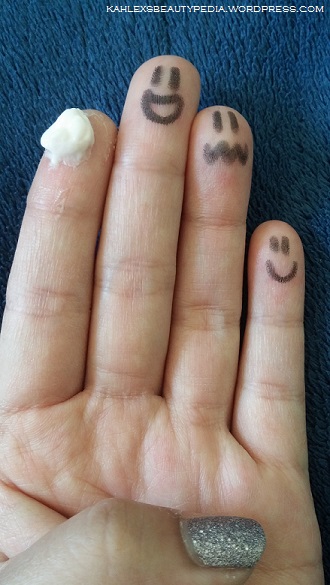
1. Look at the blood vessels on the underside of your arm. If they look blue, then you have a cool undertone. If they look green, then you have a warm undertone. If you either cannot tell or have both blue and green blood vessels, then you are neutral. I have some blue veins and a few green veins, so according to this test, I have neutral undertones.

A little difficult to see, but my blood vessels are where there are arrows.

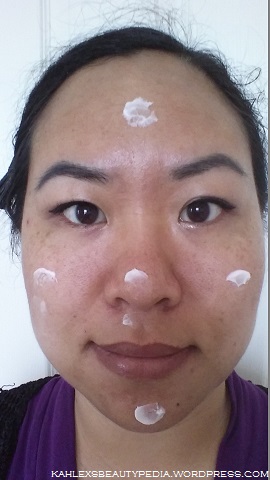
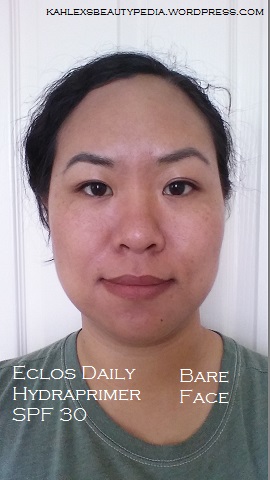
2. Drape a white towel or piece of cloth around your neck and shoulders (or hold a white piece of paper under your face, like I did) and look at your face. The white will reflect the true color. If your face looks more pink, then you have cool undertones. If your face looks more yellow, then you have warm undertones. If you can’t tell, then you probably have neutral undertones. My face looks more yellow, which indicates that I have warm undertones. 3. What colors do you prefer in your clothing? If you think you look best in cool colors, then you probably have cool undertones. If you think you look best in warm colors, then you probably have warm undertones. If you think you look great in every color, then you probably have neutral undertones. I haven’t found a color I looked terrible in yet, so according to this test, I’m neutral.

4. What jewelry looks best on you (this is not a question of what you prefer, but what you think looks best on you)? If silver jewelry looks best on you, then you probably have cool undertones. If gold jewelry looks best on you, then you probably have warm undertones. If you look great (or terrible) in everything, then you probably have neutral undertones. Now, I prefer wearing silver jewelry, but I have to admit that gold looks better on me, which indicates that I have warm undertones.

5. What happens when you are exposed to the sun for extended periods of time? If you burn and either tan minimally or not at all, then you probably have cool undertones. If you tan easily and tend to not burn, then you probably have warm undertones. If you spontaneously burst into flames, then you are a vampire, and you should probably be more careful. I tend to tan very easily. I don’t tend to burn. This indicates that I have warm undertones.

If your results from asking all of these were different, as mine were, then you may be neutral, leaning warm or leaning cool. Here is a summary of my results:

1. Neutral

2. Warm

3. Neutral

4. Warm

5. Warm

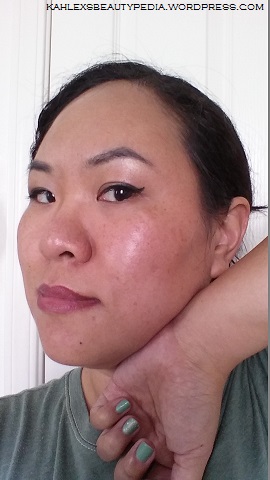
Basically, if you put cool to warm on a scale from 1-10 (1 being 100% cool, 5 being neutral, and 10 being 100% warm), I think I’d be somewhere around an 8 or 9. All it really means is that I’m going to gravitate toward foundations with warmer undertones. If you use a foundation that is the correct shade, but the wrong undertone, you won’t look right. I was matched as NC 25 (the MAC system goes by NOT Cool [NC = warm] and NOT Warm [NW = cool], if you ever get confused about their shades) in the MAC Studio Fix Fluid Foundation. Behold: NW 25.

A little hard to tell… apparently I’m too good at blending.

See how the half of my face with the foundation on it looks kind of pink? Now, because I have neutral-warm undertones, it’s not SO bad. I can still make it work without looking completely bizarre (also, I seem to be some kind of blending wizard… or maybe it’s just a really blendable foundation). You’ll see in a later photo that it really is too pink for me.

It is important to note that just because you have natural rosiness in your skin (ex. pink cheeks, red splotches, etc.) does not necessarily mean that you have cool (pink) undertones. If you’ve ever tried a foundation that made you look too pink or too yellow, then you likely used a foundation with the wrong undertone.

Shade

Finding the right shade is somewhat simpler. You basically just look for whatever looks like it is the color of your skin (make sure it’s the right undertone, of course). Now, this is how I like to find the right shade (typically at Sephora, Ulta’s higher-end section, or a department store counter, where I can swatch foundations):

1. At home, when you still have no makeup on your face, put the back of your hand up next to your face and look at the difference in color. For me, the back of my hand is a few shades darker than my face.

The back of my hand, compared to my bare face.

2. Still at home, still with no makeup on your face, put the inside of your arm up next to your face and look at the difference in color. For me, the inside of my arm is a few shades lighter than my face.

The inside of my arm, compared to my bare face.

3. Go to the store/counter and swatch shades that look pretty close on both places. I look for a shade that is between the shades of the back of my hand and the inside of my arm.

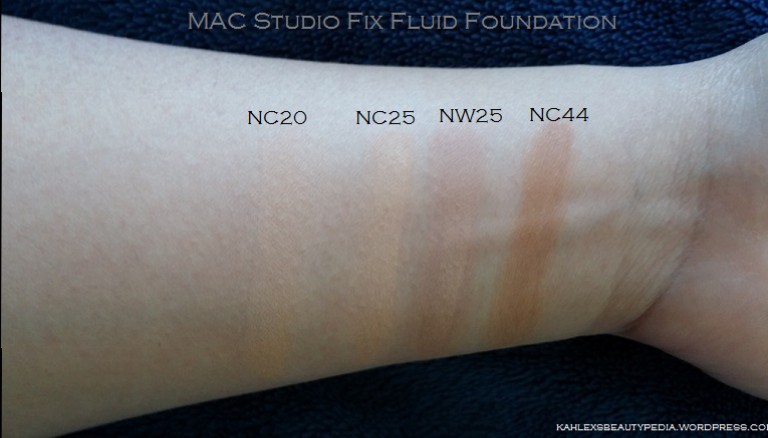
NC 20 blends pretty well into my skin on the inside of my arm, so it will be too light for my face. Also, you can see that NW 25 is too pink.

NC 25 is slightly too light on the back of my hand, but slightly too dark on the inside of my arm, which means it should match my face.

4. You want to test the foundation along your jawline and make sure it matches both your neck and your face. I start by swatching on my hand and arm because you have pretty limited space on your face, while you (probably) have two hands and two arms, so you can swatch a lot. I don’t really mind having hardcore Swatch Hands/Arms, but I don’t really want to have Swatch Face. You don’t want your face looking like a patchwork quilt, do you? Even if you continuously wipe off the swatches, I just don’t want to be swatching and wiping foundation swatches off of my face too much (in fact, doing all the half-face swatches for this post made my face very unhappy). Personal preference.

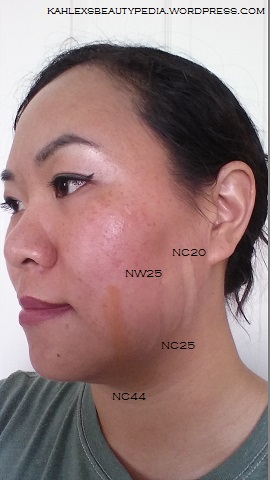
You can see that NC25 blends in perfectly with both my face and my neck.

5. When you find something that looks like the right shade, you want to actually blend it in along your jawline. Alternatively, apply it all over your face (a sales associate may do this for you, if one of them is assisting you). 6. Go near a window or outside with a mirror (I usually have a compact with me because I just love staring at myself find it handy for touch-ups on the go, since I’m not always someplace with a mirror). Check the shade match in natural lighting. A shade that is too light will look ashy on you. Here is NC 20:

NC 20 makes the right side of my face look slightly ashy, which means it is too light.

A shade that is too dark will look kind of orange, because that is how additional pigment tends to look on the skin. Here is NC 44 (I asked for a sample of foundation that would be visibly too dark for me on camera. I think this is a little dramatic, but it does demonstrate the point really well).

NC 44 is obviously too dark. It shows up quite orange.

The shade that is just right will blend right in and not look out of place at all. Here is NC 25:

NC 25 blends seamlessly into my skin.

Keep in mind that your skin may be different colors according to the seasons. In the summer, when you are exposed to more sunlight, you may need a darker shade. In the winter, when you are exposed to less sunlight, you may need a lighter shade. When you’re in between shades (since you don’t become more tan or more pale all at once), you can mix your foundations to get the right shade.

Oxidation

When a foundation mixes with your sebum (i.e. natural oils produced by your skin), it may oxidize, or darken in color. If you notice a foundation turning darker or orange on you over the course of the day, this means it is oxidizing. Ideally, your foundation will not oxidize. However, using a primer can help prevent oxidation by creating a barrier between your skin and your foundation, which prevents your sebum and your foundation from mixing. Using a translucent powder to set your foundation can also help prevent oxidation.

Lasting Power

So you’ve found a foundation with a formula that you like that provides the coverage you want that is the right undertone and shade. Now it’s time to test the lasting power. Ask for a sample (if you’re at a counter, since drugstores don’t tend to provide samples). If the sales associate gets catty or mean about samples, or then explain that you want to test the color match in natural lighting, see how long it lasts, and test how well it wears throughout the day before you invest in a more expensive foundation. Most sales associates will be understanding and provide you with a sample, but if not, then ask someone else. Ideally, you want your foundation to last all day (probably approximately eight hours). Primers, setting powders, setting sprays, and touch-ups throughout the day can help your foundation last all day.

Summary

In sum, you want your foundation to have your desired:

  • Formula (liquid, cream, powder)
  • Base (silicone, water, or oil)
  • Coverage (sheer, light, medium, full)
  • Buildability
  • Finish (matte, natural, luminous)
  • Feeling (light, medium, heavy)
  • Shade
  • Undertone (warm, neutral, cool)
  • Wear time

I know this is a lot to consider, but when everything is just right, it will be like angels from heaven perfected your face. I hope this post was helpful, and I wish you all luck in your foundation searches! Feel free to leave comments, questions, and feedback below.

All About Face Primers

In researching more about face primers for this post, I came across many unflattering comparisons between face primers and paint primers. I’m not fond of the analogy of makeup on one’s face to paint on a wall or canvas. But let’s face it: your face IS a canvas for makeup, and primer helps prep that canvas so that your makeup applies more smoothly and lasts longer.


What Do Primers Do?

There are a lot of different primers out there today, but they are all meant to smooth out the surface of your skin and fill in pores, fine lines, and wrinkles, which creates a smoother surface for smoother and easier foundation application. They also create a barrier that keeps your sebum (oils naturally produced by your skin throughout the day) from breaking down your foundation. Don’t worry, though; it’s a permeable barrier. Your skin can still breathe. Think of primer as being like a tea bag. Air can still get through; your skin will not suffocate when you use a primer. However, it still keeps your skin (along with your moisturizer/skincare/etc.) separate from your foundation/BB cream/etc. Additionally, because it creates this barrier, it can keep your foundation from oxidizing (when your foundation turns a few shades darker once applied to your face, as it mixes with your sebum). As long as you remove your makeup every night, primer will not clog your pores or cause breakouts (as with all cosmetics, they can cause you to break out if you are sensitive to a certain ingredient; therefore, I recommend that you check ingredients lists if you have known allergies/react poorly to particular ingredients, or patch test products before applying to your entire face, especially if you have sensitive skin).

Here are some other things primers can do (NOTE: Not all primers do all of these things!):

  • Brighten or add dewiness to your face
  • Color-correct (green for redness, purple for sallowness)
  • Absorb oil/mattify/control oil throughout the day (Avoid these if you have dry skin. They will make your skin drier.)
  • Tinted primers may provide some coverage (foundation on top will boost the coverage, or for those of you with even skin, the tint from the primer may be enough)
  • Contain botanicals and other ingredients to soothe, refresh, and/or hydrate the skin
  • Provide anti-aging benefits

You want to select a primer that does what you want it to do. This will be different for everybody. Read labels, reviews, etc. I highly recommend asking for samples, if possible. Samples allow you to try out a product and see how it feels, performs, and wears throughout the day. This way, you know if you like it before you buy it.


Water- vs. Silicone-Based Primers: What’s the Difference?

You don’t want to use a silicone-based primer if you use a water-based foundation. It can cause your foundation to pill and look powdery because the water in the foundation will not be able to absorb into your skin (which means your foundation won’t sit correctly on your skin). Water-based primers can work okay with silicone-based foundations because the water tends to absorb into the skin. Still, it’s something to be aware of it you’re experiencing pilling or powdery-ness. Click here to read my post on how to determine whether a product is water- or silicone-based.

Otherwise, whether you use a water- or a silicone-based primer is a matter of personal preference. If you don’t enjoy that silicone texture, you might consider trying a water-based primer.

While pore-filling primers, such as Benefit Porefessional, NYX Pore Filler, and Too Faced Primed and Poreless, are designed specifically to fill in your visible pores, you can also use any primer to do this as long as you tap them into your pores (this gets the product into your pores to fill them in). In my experience, though, pore-filling primers are best at filling in pores (duh), and silicone-primers are better at filling in pores than water-based primers.


Primer Application

Okay, you managed to choose a primer. Now, how do you apply? Technical jargon and complicated instructions incoming:

  1. Moisturize. I don’t care what skin type you have (even oily skin needs moisture). Use a moisturizer that is appropriate for your skin type. Apply sunscreen. Wait for your moisturizer and sunscreen to absorb completely (I can’t tell you how much time this will take, but your skin should no longer feel tacky from freshly-applied moisturizer and sunscreen). You can use this time to do your eyebrows and/or eye makeup (I like to do my eye makeup before foundation because fallout, if I get any, is easier to clean up before applying foundation), do your hair, do a bunch of jumping jacks, practice your “Blue Steel” face… It’s your time; do what you want!

    My pores! My cavernous pores!

    My pores, after moisturizing (I did my eye makeup while waiting for it to absorb). You guys don’t know how difficult it is to take a selfie this close up without going cross-eyed.

  2. Squeeze out about a pea- or raisin-sized blob. A little goes a long way, so you really don’t need a lot. As stated above, primer creates a barrier. It does not work like glue. It doesn’t help “stick” your foundation to your skin. If you use too much primer (particularly a silicone-based primer; water-based primers tend to absorb into your skin better, while silicone-based primers create a silicone barrier on top of your skin), it can make your foundation slide off sooner and/or apply unevenly, which completely cancels out the entire purpose of a primer. Additionally, it’s easier to add more primer than to try and scrape primer off of your face. So just start with less and add a little bit more if you need it.

    Someone told me the faces made them laugh, so enjoy!

    About this much primer. This is Mally’s Perfect Prep Poreless Primer.

  3. Dab the primer onto your face. This just ensures that you distribute the primer evenly all over your face.

    I don't recommend going out in public like this.

    Like this. Very attractive.

  4. Rub the primer in. (Oh dear; I hope I didn’t lose any of you.) Your entire face should be covered in a very thin layer. If you’re trying to fill in pores or fine lines and wrinkles, you want to tap your primer onto those areas. If your primer starts to pill off, then you have used way too much.
    The difference between tapping and rubbing.

    I kept going cross-eyed, so I opted to look to the right.

    As you can see, the pores on the right side of my face (my right, your left) look much smaller than the pores on the left side of my face (my left, your right). This illustrates the difference between tapping and rubbing. So if you want to fill in those pores, make sure you tap, tap, tap!

  5. Wait about 15-20 seconds for your primer to dry. I recommend using this time to admire your smooth, smooth skin.
  6. Apply tinted moisturizer, foundation, concealer, BB cream, CC cream, ZZ cream (I am not aware of any ZZ creams, but I wouldn’t be surprised if some cosmetics company created one), and/or whatever else you like to wear.

    Smooth operator...

    Completed face. So smooth!


Can You Use More Than One Primer At a Time?

Of course you can!

For example, I might use a mattifying/oil-control primer on my t-zone, where I tend to get oily, and another primer elsewhere, where my skin is normal. If I used a mattifying/oil control primer all over, I would dry up my normal areas. You don’t have to use just one primer all over your face, though, of course, you can if you want to.


Primer to Seal in Moisturizer

...but my skin sure feels nice!

I am not at my best in the morning…

As previously mentioned, primer creates a (permeable) barrier on your skin. While doing research for this post, I found several mentions of using it at night to seal in your nighttime moisturizer /skincare (Mally mentions this use in her video when talking about her Perfect Prep Poreless Primer). So of course I had to test it out. I tried it for a few nights using Mally’s primer, since Mally specifically mentions this use of her primer. My skin is combination oily/normal. I found that this actually did help. Normally, when I wake up in the morning, my face is pretty greasy (I think because the moisturizer kind of evaporates or something while I’m sleeping, and my skin needs to produce more oil to keep itself moisturized). When I tried using the primer to seal in my moisturizer, I woke up with perfect skin. It felt very comfortable and was not at all greasy-looking or –feeling. However, I can’t say anything about the long-term effects because I’d have to do this for, well, a long time. Those of you with dry skin may especially want to give this a shot. Of course, you have to wash it off in the morning. I always wash my face in the morning to give myself a clean start.

Normally, when I wake up, my t-zone is SHINY SHINY SHINY SHINY SHINY SHIIIIIINYYYYYY!! But as you can see, my skin is pretty matte when I use primer to seal in my nighttime moisturizer/skincare. (Hopefully, I haven’t scarred you by showing you my morning face. Scroll back up to my completed face to see Pretty Kahlex, if you wish.)

I hope this has been helpful! Thank you for reading, and feel free to leave comments, questions, and feedback below

How to Tell if Your Base Products are Silicone-, Water-, or Oil-Based

So you apply your primer and foundation, and partway through the day, you notice that your foundation looks weird. So you run screaming to the Internet, and Google tells you a bunch of stuff like “use products that have the same base” and “don’t put the water-based things on top of the silicone-based things.” But how can you tell what base your products have? You don’t have a chemistry degree; you just want to look gorgeous. Don’t panic, because I am here to help. By the end of this post, you’ll be able to figure out what base your products are.

In order to determine whether a product is water-based or silicone-based, you have to look at the ingredients. -Cone/-methicone, and -siloxane words near the top of the list tend to signal a silicone-based product. Some of the most common silicones used in cosmetics are cyclopentasiloxane, cyclohexasiloxane, dimethicone and phenyl trimethicone. These are the kinds of words you want to look for near the top of your ingredients lists (ingredients are typically listed in order, beginning with what is in there most and ending with what is in there the least). Water will be at the top of the list for most liquid products because water makes it… well… liquid-y. It doesn’t mean that a product is water-based. Without water, the product would not be spreadable/blendable. For example:

MUFE HD Microperfecting Primer

Photo and ingredients list taken from Sephora website

MAKE UP FOR EVER HD Microperfecting Primer Ingredients: Aqua (Water), Dimethicone, Trisiloxane, PEG-12 Dimethicone, Dimethicone/Vinyl Dimethicone Crosspolymer, Methylpropanediol, Butylene Glycol, Pentylene Glycol, Hydroxyethyl Acrylate/Sodium Acryloyldimethyl Taurate Copolymer, Squalane, Glyceryl Caprylate, Lauryl PEG/PPG-18/18 Methicone, Phenoxyethanol, Ceteth-10, Laureth-4, Ethylglycerin, Panthenol, Potassium Sorbate, Polysorbate 60, Parfum (Fragrance), Argania Spinosa Extract (Argania Spinosa Kernel Extract), C12-14 Pareth-12, Hydrolyzed Algin, Dodecene, Sorbitan Isostearate, Isostearyl Alcohol, Laminaria Digitata Extract, Polyaminopropyl Biguanide, Tromethamine, Biosaccharide Gum-1, Sodium Cocoyl Glutamate, Sodium Hyaluronate, Carbomer, Hexyl Cinnamal, Benzyl Salicylate, Limonene, Butylphenyl Methylpropional, Linalool. [CI 19140 (Yellow 5 Lake), CI 75470 (Carmine), CI 77007 (Ultramarines), CI 77288 (Chromium Oxide Greens), CI 77289 (Chromium Hydroxide Green), CI 77491 (Iron Oxides), CI 77492 (Iron Oxides), CI 77499 (Iron Oxides), CI 77742 (Manganese Violet), CI 77891 (Titanium Dioxide)].

See the bold words? Definitely silicone-based! Again, the water keeps it a more liquid-y consistency so it’s easily spreadable (if it didn’t contain water, it would be a solid, and you would have to apply it by smacking it on your face). It doesn’t mean that the product is water-based. Particularly with primers, I can always tell because it has that slippery “silicone” feeling. Now, let’s look at a water-based primer:

Photo and ingredients from Sephora.com.

Photo and ingredients list taken from Sephora website.

Laura Mercier Foundation Primer – Oil Free Ingredients: Water (Aqua), Ethylhexyl Palmitate, Stearic Acid, Isodecyl Isononanoate, Glycerin, Caprylic/Capric Triglyceride, C20-22 Alkyl Phosphate, C22-20 Alcohols, Squalane, Butylene Glycol, Cetyl Esters, Phenoxyethanol, Boron Nitride, Silica, Cetearyl Alcohol, Sodium Hydroxide, Allantoin Tocopherol Acetate, Ascorbyl Palmitate, Hamaelis Viginiana (Witch Hazel) Extract, Cucumis sativus (Cucumber) Fruit Extract, Cymbopogon Schoenanthus Extract, Camellia Sinensis Leaf Extract, Hydroxyethylcellulose, Retinyl Palmitate, Dimethicone, Polyamino Sugar Condesate, Hydroxyethyl Acrylate/Sodium Acryloyldimethyl Taurate Copolymer, Chlorphensin, Benzoic Acid, Polysorbate 60, Polymethyl Methacrylate, Saccharomyces/Xylium Black Tea Ferment, Methylparaben, Propylparaben, Ethylparaben, Butylparaben, Isobutylparaben, Potassium Sorbate, Green 5 (CI 61570), Yellow 5 (CI 19140).

See how there are no -cone/-methicone or -siloxane words near the top of the list? That means that it’s water-based. This primer does contain dimethicone, which is a silicone, but it’s very low on the list, which means that it contains a very small amount of silicone. Thus, because this primer contains much more water (and other ingredients) than silicone, it is water-based.

Oil-based products are exceptionally rare. After much searching, I finally found one: Alexandra de Markoff Countess Isserlyn Cream Makeup (another is NARS Balanced Foundation, which has been discontinued, so I could not find an easily copy/paste-able ingredients list). Let’s look at the ingredients:

Photo from Amazon.com; cannot find where I got the ingredients list.

Photo from Amazon.com; cannot find where I got the ingredients list.

Water (aqua), Decyl Oleate, Lanolin Oil, Propylene Glycol, Talc, Isotearic Acid, Stearic Acid, Glyceryl Stearate SE, Cetyl Acetate, Triethanolamine, Fragrance (parfum), Emulsifying Wax NF, Magnesium Aluminum Silicate, Acetylated Lanolin Alcohol, PPG-12-PEG-65 Lanolin Oil, Imidazolidinyl Urea, Methylparaben, Propylparaben. May contain Titanium Dioxide (CI 77891), Iron Oxides (CI 77491, CI77492, CI 77499, Ultramarines (CI77007)

Yes, water is listed as the first ingredient, but that is to keep the product more blendable. The second and third ingredients (in bold) are definitely oils. Phew! You don’t know how many ingredients lists I went through to find that! I swear unicorns are easier to find! They are unlikely to be of concern to you because chances are you’re not using an oil-based foundation (if you are using an oil-based foundation, check your closet for a herd of unicorns). They seem to work best with oil-based primers. Good luck finding one.

This rule (i.e. -cone/methicone or -siloxane words near the top of the list indicate a silicone-based product) generally applies for viscous products. NARS Sheer Glow, for example, is an exception, as it is an exceptionally runny product.

NARS Sheer Glow

Photo and ingredients list taken from Sephora website.

NARS Sheer Glow Ingredients: Aqua (Water), Cyclopentasiloxane, Butylene, Glycol, Glycerine, Polymethylsilsesquioxane, Dimethicone, Dimethicone/vinal Dimethicone Crosspolymer, Triethylhexanoin, Peg-10 Dimethicone, Dis-butydimethicone Polyglyceryl-3, Disteardimonium Hectorite, Sodium Glutamate, Sorbitan, Sesquiisostearate, 1-Methylhdantoin-2-imide, Phenoxyenthanol, Sodium Dehydroacetate, Triethoxycaprylylsilane, Polusilocone-2, Serralysin, Curcuma Longa, Glycuosyl Hesperidin, Ascorbyl Glucoside, Tocpherol, [+/- (may contain): CI 77891 (Titanium dioxide), CI 77492 (Iron oxides), CI 77491 (Iron oxides), CI 77499 (Iron oxides)].

Even though it contains silicones, it contains a relatively low amount of silicones compared to the amount of water it contains, making it a water-based foundation. If you’re not completely sure, then try this:

1. Spread a silicone-based primer on the back of your hand or somewhere on your arm in a thin, even layer. With primers, it’s much easier to tell if it s silicone- or water-based.

2. Apply a small amount of foundation over the primer.

3. Wait about 30 seconds

Hey, I never claimed to be an artist...

Left: Cargo HD Picture Perfect Pore Refining Primer (water-based, denoted by water droplet drawn underneath) Right: L’Oreal Magic Perfecting Base (silicone-based)

First of all, yes, the foundation is too dark for the underside of my forearm. It matches my face, though. Second of all, yes, that is kind of a crappy rectangle. I never claimed to be an artist.

Anyway, you can see that on top of the water-based primer, NARS Sheer Glow looks like it blends into the texture of my skin perfectly. On top of the silicone-based primer, it’s started to pill off and it looks kind of like powder just sitting on top of my skin. This is what happens when you use a water-based foundation on top of a silicone-based primer.

Also, you could test it on your face, but I think it’s better to test on your arm so that if you do end up using a water-based foundation on top of a silicone-based primer, you don’t have to walk around all day with your face looking like the right portion of the box above.

You want water-based primers with water-based foundations (or tinted moisturizers, BB creams, CC creams, concealer, or any other base products; I’m just going to keep typing “foundations” for the sake of brevity). It’s similar to the way that oil and water do not mix. The two different bases (water and silicone) do not mix well and can cause your foundation to pill. In particular, using a silicone-based primer with a water-based foundation causes the foundation to pill because the primer creates a silicone barrier. When you try to apply a water-based foundation on top of that, the silicone “repels” the water from the foundation and does not let the water in the foundation soak in the way that a water-based foundation needs to in order to blend into the texture of your skin. In my experience, using a silicone-based foundation on top of a water-based primer does not result in the same problem, because the water in the primer absorbs into your skin and the foundation is able to apply easily on top of it.

Where does your moisturizer/sunscreen fit into all of this?

Give your moisturizer time to absorb fully, meaning your skin should no longer have that “tacky” feeling that you have right after applying moisturizer. If you use sunscreen (which you should, regardless of whether it’s sunny outside), you need to let that absorb as well. The base of your moisturizer/sunscreen is irrelevant, because if you allow them to absorb completely, they will not affect makeup application at all. If you begin applying primer and foundation before your moisturizer and/or sunscreen has fully absorbed, they can cause your makeup to break up sooner, which is the opposite of what you want. If you don’t want to have to wait for your moisturizer and sunscreen to absorb (for whatever reason), then look for products that absorb quickly. Alternatively, blot your face before you start applying your primer.

What about your powder?

Similarly, your powder is irrelevant to the base of your foundation/primer. There is no such thing as a water-based powder (it wouldn’t be a powder). If your powder isn’t working with your foundation/primer and giving you the look that you want, it is not related to the base of your foundation/primer.

A Final Note…

Please remember that using two products with the same base doesn’t necessarily mean that the products will work for you. Not every product works for every person. You may need to experiment to find the right combination for you. I highly recommend asking for samples, as they are a much cheaper (i.e. FREE) method of trying out a product. You can ask for samples of any product that can be sanitized and put in a small sample jar, such as primer and foundation.

I hope this post has been helpful.I know that the whole issue of silicone- and water-based products can make one feel overwhelmed. Fortunately, you don’t need to be a chemist to discern the difference. Feel free to leave comments, questions, and feedback.

How to Remove Eye Makeup (Including Stubborn Mascara and Gel Eyeliner)

“This mascara is so difficult to remove! I scrubbed at it for like five minutes and it still didn’t come off!”

“After 10 minutes I was finally able to scrub off most of my eyeliner, but there was still some left. I went to bed and it was still there in the morning, so I scrubbed my eyes some more.”

“I had such a hard time removing my mascara! I scrubbed off like half my eyelashes!”

I really hope I’m not the only one who looks like they’re having a stroke when they see or hear people typing or saying these kinds of things:

Sometimes I also twitch.

You can attribute this to either a blood clot in my brain or to shock and horror. Usually I try to avoid looking like an idiot on the internet, but this is for a good cause.


Your eye area is delicate. The skin is thinner than it is on the rest of your face. Scrubbing can result in lost lashes, wrinkles, and eye irritation. VERY BAD. DON’T DO IT. Use my method instead! I promise that it will remove your eye makeup without scrubbing! Cross my heart and hope to die.

You will need two things:

  1. Makeup remover (use anything that doesn’t irritate your eyes; you can also use cold cream, cleansing lotion/balm, petroleum jelly [commonly known as Vaseline], or oils, such as mineral oil, olive oil, or coconut oil, but patch test to make sure it doesn’t break you out or irritate your skin/eyes)
  2. Cotton balls or pads
But you can use any remover you like.

The stars of my show: Neutrogena Oil-Free Eye Makeup Remover and some cotton balls from CVS.

Follow this simple process:

Tough to see the difference, but I tried...

Dry cotton ball (left) and cotton ball with remover (right). Trying to show about how much I use. The entire visible surface of the cotton ball on the right is covered with makeup remover.

  1. If you are using a makeup remover, you probably have to shake it to mix the two liquids. Get a good amount of makeup remover on your cotton ball/pad. Don’t just get it in one spot; I like to cover the entire side in makeup remover. I prefer cotton balls because you can get more product on them without the liquid soaking through. If you’re using petroleum jelly, cold cream, a cleansing lotion/balm, or coconut oil, which is solid at room temperature, you want to just apply it directly instead so that your body heat can melt it. Alternatively, if you choose to use one of those eye makeup remover pads, just take one of those out. In my experience, though, those pads don’t tend to be quite wet enough (i.e. not enough remover).
  2. Put the cotton ball/pad directly onto your closed eyelid. If you are using coconut oil, cold cream, or a cleansing lotion/balm, you want to spread it out so it covers the entire area you want to clean (all over your eye area; keep your eyes closed) and just leave it sitting there. You can also just apply oils directly to your eyelids, but I prefer to use cotton balls so it’s less messy.
  3. Hold it there for about 10 seconds. Removing eye makeup is not like erasing white boards (i.e. removers are not magic potions that instantly take off eye makeup). The remover needs some time to dissolve your eye makeup, particularly stubborn mascara.
  4. Wipe downward gently. DO NOT SCRUB AT YOUR DELICATE EYE AREA. Scrubbing can result in wrinkles, eye irritation, and lost lashes, as previously mentioned. Also, you don’t want to feel any pulling or tugging. You want to be very, very gentle with your eye area.
  5. If there is still eye makeup remaining, hold the cotton ball/pad on your closed eyelid for about another 10 seconds, then wipe downward gently again. Repeat until your eye area is clean of any makeup. You may need another cotton ball/pad or to add more remover to your current cotton ball/pad for particularly stubborn eye makeup.
  6. You may have some mascara remaining on the bottoms of your lashes. You can place your cotton ball underneath them and swipe upward gently.
  7. If there is some oily residue, take a clean cotton ball/pad to (gently) wipe or dab off the residue. Alternatively, wash your face to get rid of the oily residue (you have to wash your face anyway to get the rest of your makeup off, right?).

If you find that this still isn’t removing everything, you may consider switching removers. Some are more effective than others.

What if I get something in my eyes?

No big deal. Your vision might get a little blurry, your eyes may water (your eyes naturally do this to wash away anything that gets into them), or your eyes may even sting, but it will not harm your eyes. However, I always keep my eyes shut pretty tightly during eye makeup removal. Just because it’s not harmful doesn’t mean I want it to get into my eyes.

Wait, I can use oil to remove my makeup?

You sure can! But make sure that the oil(s) is/are organic, cold- or expeller- pressed, extra virgin (you don’t want your oils to be even slightly slutty), and un-fragranced. Some people may experience irritation or breakouts, or be allergic to an oil, so be aware that it’s not for everyone.

I hope this is helpful! Feel free to ask questions, comment, and/or recommend your favorite removers or other methods you like to use.

Eye Shadow Primers and Bases

Whether you are a makeup expert or a makeup dabbler, you have probably seen or heard people writing or talking about how they use an eye shadow base and/or an eye shadow primer. But what is the difference? Can you get away with only using one or the other? Should you use both? What do they do, anyway? Do not fear; I am here to answer all of your questions!

Eye Shadow Primer

What is it?

Eye shadow primer is a lightweight, thin, creamy liquid that is applied directly to the eyelids to prepare the eyelids for eye shadow application. It typically blends out to be invisible, but some are meant to even out discoloration that naturally occurs on some people’s eyelids (most people will use an eye base for this; eye bases will be discussed below). Eye shadow primer creates a smooth, tacky surface on the eyelid that helps powder eye shadows adhere better to the skin of the eyelid, improving pigmentation and staying power (i.e. prevents your eye shadow from fading throughout the day). Eye shadow primer also acts as a barrier between the skin of your eyelids and your eye shadow, preventing your sebum (i.e. oils naturally produced by your skin) from mixing with the eye shadow and creasing (i.e. creases appearing in your eye shadow during the day as the result of blinking and normal eye movements). Basically, an eye shadow primer will 1) improve the pigmentation of your eye shadows, 2) keep your eye shadow on all day without fading, and 3) prevent your eye shadow from creasing.

You Want To Use a Primer If:

  1. You are dissatisfied with the pigmentation of your eye shadows;
  2. Your eye shadow does not last throughout the day without fading;
  3. You have oily and/or sweaty eyelids; and/or
  4. Your eye shadow creases before you are done with your day.

Alternatively, if your lids are not particularly oily, you can use a very small amount of foundation as primer to help with your eye shadows’ pigmentation.

How to Use:

  1. If you are using an eye shadow primer with a doe-foot applicator/wand, then dab it onto your lids (or dab onto your finger, then dab onto lids; if using a squeeze tube, then squeeze out about a drop of primer, then dab onto lids), then blend with your ring finger (your gentlest touch) all over your lids. Cover the entire area where you plan on putting any eye shadow, from your lash line up to your brow bone if you put eye shadow all the way up there (as a highlight, or whatever). Use a nice, thin layer. You don’t need to be piling this on. Also, apply to the lower lash line if you plan on using any liner on your lower lash line. Some people use eye shadow primer under their eyes to keep their under-eye concealer from creasing. If you have problems with your under-eye concealer creasing you can place this everywhere you put your under-eye concealer (i.e. under your eyes… I know… shocking!)
    One dab is all you need for one eyelid.

    About how much I use for one eyelid (one dab from a doe-foot wand). I drew some happy faces on my fingers because the photograph was really boring otherwise.

    Halve this for the amount I use on one eyelid.

    About how much I use for two eyelids (from a squeeze tube). I wanted to show you how much I use for one eyelid, but I squeezed out too much by accident. Halve that for the amount I use for one eyelid.

  2. Wait for it to dry. You want it to be dry because if you apply shadow over wet primer, it will be patchy and difficult to blend. It should only take a few seconds for the primer to dry. Make kissy faces in your mirror, pee, rock out to a song, or all of the above (hey, I won’t judge you).
  3. Make sure your eyelids no longer feel wet from freshly-applied eye shadow primer.
  4. Apply eye shadow. Some people like to start by applying a layer of eye shadow that matches their skin tone all over first so that blending is easier (also, some people like to do this as an alternative to using a base). You can apply eye shadow however you like. The sky’s the limit!

What Primer(s) Do I Recommend?

This is an immensely difficult topic. Because cosmetics are so personal, different products work differently for different people. All I can really do is to point you to these two blog posts from Brightest Bulb In the Box, showing how well particular primers performed with regard to eye shadow pigmentation and fading after four hours on her arm:

You can see in her swatches how primer improves the pigmentation of the eye shadow and helps with fading.

If you are using an eye shadow primer, but your eye shadow is still creasing, there are a few possibilities:

1. You are using too much primer; or

2. It is not The One Primer for you. This happens. Not every product works for everybody, and that is fine. We can’t all be friends, sadly.


Eye Shadow Bases

What is it?

Eye shadow base is a thicker, creamier product. Its primary purpose is to intensify the color of eye shadow by providing a base for the powder to adhere to. For example, if you want to use purple eye shadow, you would use a purple base underneath the purple powder eye shadow to make it extra purple.  Because it provides a sticky base for eye shadow to adhere to, it helps keep your eye shadow from fading the same way a primer does. For example:

That's some intense pigmentation with a base!

The colored bases were Urban Decay 24/7 Glide-On Eye Pencils from the Black Market set that was sold for the 2013 holidays.


You can see that the white base helped the eye shadows show up more blue or purple, respectively. The base that (approximately) matched the eye shadows intensified the pigmentation greatly and added some incredible sheen that you cannot see in the swatches on bare skin.

Using different bases can change the way duochrome eye shadows look. A darker base will help the “other color” to show up more. A demonstration using MAC Club:

The duochrome is more apparent with a darker base!

MAC Club on bare skin and over NYX Jumbo Eye Pencil in Milk, Rimmel Scandal Eyes Eye Shadow Stick in 002 Bulletproof Beige, Maybelline Color Tattoo in Bad to the Bronze, Rimmel Scandal Eyes Kohl Kajal eyeliner in 003 Brown, and UD 24/7 Glide-On Eye Pencil in Zero. I purposely left some of the base visible around each eye shadow swatch so you could see the color of the base. I’ll have you know I’m actually excellent at coloring inside the lines (passed kindergarten with flying colors)!

You can see that on bare skin, Club looks brown. With different bases, that blackish-green duochrome is more apparent.You can see that Club over the black base is just the blackish-green color. No brown at all. Absolutely gorgeous.

However, due to the creamier texture, eye shadow bases often crease, unlike primers, which help prevent creasing.

Another use for an eye shadow base is to even out discoloration in your eyelids. The skin on your eyelids is often very thin, so sometimes, blood vessels can discolor your eyelids. If you use a base that is the same color as your skin, or a color-correcting color (i.e. green to cancel out reds, or salmon/yellow to cancel out blue/purple), you can eliminate the effect of discoloration on your eye shadow. You can use a concealer for this purpose.

You Want To Use a Base If:

  1. You want your eye shadow colors to show up more true-to-color; and/or
  2. You want to cancel out discoloration in your eyelids that may be affecting how colors look on your eyelids.

How to Use:

  1. Apply to lids. It is difficult to give guidelines regarding amount, because I usually just scribble on my lid (if using pencil) or dab my finger into cream shadow until I have “enough.”
  2. Blend it out so it’s evenly distributed wherever you want it. Use your ring finger again (be gentle on your delicate eye area). You want to keep it to a pretty thin layer to minimize creasing. I typically use my fingers and rub (gently), but you can use a brush if you prefer. Give them a few seconds to set.
  3. Apply eye shadow. Enjoy your intensified color.

What Base(s) Do I Recommend?

This is, again, a difficult question because cosmetics are so personal and results may vary. However, you can use pretty much any cream eye product, including cream eye shadows and even eyeliners. Some popular ones include MAC Paint Pots, Make Up For Ever Aqua Cream, Maybelline Color Tattoos, and NYX Jumbo Eye Pencils.

If you experience creasing while using a base, you may be applying too much base. Try using less. Just the minimal amount to cover the area in a thin layer.

Can You Use Both a Primer and a Base?

Of course you can! The primer will help keep the base (and your eye shadows) from creasing. Both the primer and base will intensify the color payoff of your eye shadows and enhance its lasting power. You would apply the primer first, then the base, then your eye shadow(s).

 Do You NEEEEEEEEEEED To Use a Primer And/Or Base?

Of course not. You do not need to wear any makeup. But if you are dissatisfied with the pigmentation of your eye shadows or experiencing fading or creasing early in the day, they are certainly helpful.

I hope this has been helpful! I know that cosmetics companies often name products differently, but the way that you use them does not change. For example, NARS Smudge Proof Eye Base is a primer, even though it is called a base. Feel free to leave comments, questions, and feedback below!